Introduction
We’ve all been there: stepping off a curb or pivoting too sharply, and suddenly—your ankle rolls. In that split second, a cascade of pain, swelling, and uncertainty follows. Ankle sprains are among the most common musculoskeletal injuries, affecting individuals of all activity levels, from daily walkers to elite athletes (Fong et al., 2007) [1]. In this post you will discover:
- The anatomy of the ankle
- Mechanism of ankle sprains
- Risk factors for ankle sprains
- Preventions strategies
- Acute management of an ankle sprain (RICE + Red flags)
- Ankle rehabilitation
- Key take aways
The anatomy of the ankle
The ankle joint is formed by the tibia and fibula (lower leg bones) articulating with the talus, which sits above the calcaneus (heel bone). Ligaments are strong bands of connective tissue that connect bones to each other and stabilize joints (Moore et al., 2014) [2]. Figures 1 and 2 below show these bones alongside the ligaments typically injured in an ankle sprain.
Figure 1 – Lateral & medial bones and ligaments of the ankle joint. Lateral & Medial view
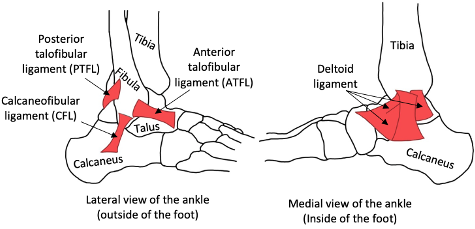
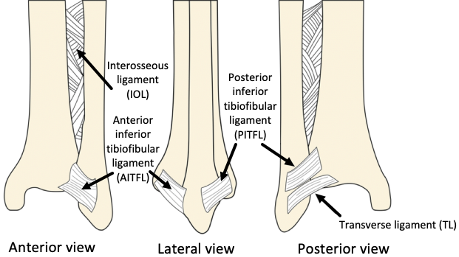
Figure 2 – Syndesmotic ligaments of the tibia and fibula. Anterior, posterior and lateral view
Mechanism of ankle sprains
A sprain is when ligaments—whose function is to support joints—are stretched beyond their normal range or torn. Overloading these ligaments can lead to pain, swelling, bruising, tenderness, and difficulty moving the ankle or bearing weight (Brukner & Khan, 2012) [3].
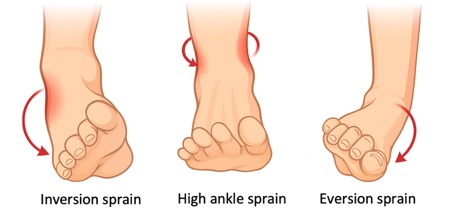
There are three main types of ankle sprains, each involving different movements and structures:
Figure 3 – The 3 main types of ankle sprains
Inversion Sprains
An inversion sprain occurs when the foot rolls inward, stretching or tearing the ligaments on the outer (lateral) side of the ankle. This is the most common type of ankle sprain and often happens during activities involving quick changes of direction, uneven surfaces, or landing awkwardly (Waterman et al., 2010) [4]. The ligaments below are usually affected in an inversion sprain (from most to least likely to be injured — refer back to Figure 1 if needed):
- Anterior Talofibular Ligament (ATFL) – Most commonly injured; supports the ankle when the foot is pointed down and rolled inward (Waterman et al., 2010) [4].
- Calcaneofibular Ligament (CFL) – Helps keep the ankle stable when the foot is flat or pointed up; often injured in more serious sprains (Waterman et al., 2010) [4].
- Posterior Talofibular Ligament (PTFL) – The least likely to be injured; supports the back of the ankle and is usually affected only in very severe sprains (Waterman et al., 2010) [4].
Eversion Sprain
An eversion sprain happens when the foot rolls outward, putting stress on the inner side of the ankle. This type of sprain is less common because the inner ligaments are thick and strong. However, when it does occur, it can be quite painful and upon rupture take some bone with it and cause an avulsion fracture (van Dijk et al., 1996) [5]. For this reason, recovery time can be quite long. With eversion sprains the deltoid ligament is affected which has 4 separate superficial and deep layer ligaments. Below are the layers that are commonly affected during an eversion sprain (from most to least likely to be injured — refer back to Figure 1 if needed):
- Tibionavicular Ligament (superficial) – Helps prevent the foot from turning too far outward and supports the front of the ankle (van Dijk et al., 1996) [5].
- Tibiocalcaneal Ligament (superficial) – Provides vertical support and helps stop the ankle from rolling outward (van Dijk et al., 1996) [5].
- Anterior Tibiotalar Ligament (deep) – Stabilizes the front part of the inner ankle during movement (van Dijk et al., 1996) [5].
- Posterior Tibiotalar Ligament (deep) – Supports the back of the ankle and keeps the heel bone from moving backward (van Dijk et al., 1996) [5].
High Ankle Sprain
A high ankle sprain involves the ligaments that hold the two lower leg bones (tibia and fibula) together just above the ankle. These injuries usually happen when the foot is forcefully twisted outwards or pushed upward, like in sports that involve sudden turns or contact. High ankle sprains are less common, but they can take longer to heal (Miller et al., 2012) [6]. The ligaments below are usually affected in a high ankle sprain (from most to least likely to be injured — refer back to Figure 2 if needed):
- Anterior Inferior Tibiofibular Ligament (AITFL) – The first to be injured; helps hold the two leg bones together and prevents twisting apart. (Miller et al., 2012) [6].
- Interosseous Ligament – A strong tissue deep between the tibia and fibula that helps keep them connected. (Miller et al., 2012) [6].
- Posterior Inferior Tibiofibular Ligament (PITFL) – Supports the back of the ankle and helps keep the bones from sliding. (Miller et al., 2012) [6].
- Transverse Tibiofibular Ligament – Adds extra support to the back of the ankle joint. (Miller et al., 2012) [6].
Risk factors for an ankle sprain
Ankle sprains often result from a combination of intrinsic (Within the Body) and extrinsic (External) factors that increase the risk of injury:
Intrinsic Factors
- Muscle imbalances: For example, if the muscles on the inside of the ankle are stronger than the ones on the outside, the weaker outside muscles may not be able to keep the ankle stable. This can cause the foot to roll inward too much, leading to an inversion sprain. (Doherty et al., 2014) [7].
- Poor Proprioception: A reduced sense of joint position and balance, especially after a previous sprain, makes re-injury more likely (Doherty et al., 2014) [7].
- History of Previous Sprains: Scar tissue and lingering instability from past injuries can compromise joint function and increase the risk of recurrence (Doherty et al., 2014) [7].
Extrinsic Factors (External Influences)
- Surface & Footwear: Walking or exercising on uneven surfaces, wearing high heels, or using shoes that lack proper support can all contribute to ankle injuries (Waddington & Adams, 2003) [8].
- Sudden Activity Increases: Rapid increases in daily activity levels or training intensity (like jumping from low to high step counts) can overload the ankle before it has adapted (Waddington & Adams, 2003) [8].
Prevention strategies
The ankle joint inherently has poor passive stability — meaning that the ligaments and bone structure alone don’t provide strong resistance against rolling or twisting forces. Unlike the hip or shoulder, which have deeper sockets or thicker ligaments to help keep the joint stable, the ankle is more exposed and mechanically vulnerable, especially on its lateral (outer) side (Hertel, 2002) [9].
This is why active stability — the control provided by muscles and the nervous system — becomes critically important in ankle function and injury prevention (McGuine & Keene, 2006) [10]. When you walk, run, jump, or land, your ankle needs to adjust instantly to keep you balanced and aligned. The only way it can do that effectively is if the muscles around the ankle are strong, responsive, and well-coordinated.
| Muscle Group | Exercise and purpose |
| Peroneals | Exercise: Resistance band eversion. Perform 3 sets of 10-12 reps Purpose: Strengthens lateral ankle support and reaction |
| Tibialis anterior | Exercise: Toe + ankle raises. Perform 3 sets of 10-12 reps Purpose: Builds dorsiflexor strength and improves gait control |
| Tibialis posterior | Exercise: Arch doming. Perform 3 sets of 10-12 reps Purpose: Supports arch and prevents overpronation |
| Gastrocnemius | Exercise: Straight-leg calf raises. Perform 3 sets of 10-12 reps. If it’s too easy, hold a weight to add resistance. Purpose: Enhances push-off strength and shock absorption |
| Soleus | Exercise: Bent-knee calf raises. Perform 3 sets of 10-12 reps. Purpose: Improves ankle endurance and control in bent positions |
Acute Management of an ankle sprain (RICE + Red Flags)
In the context of an ankle sprain, the term “acute” refers to the very early phase of injury—typically the first 48 to 72 hours—when inflammation, pain, and swelling are at their peak and prompt intervention can make a big difference in recovery. Acute management revolves around two core ideas: first, applying the RICE principles (Rest, Ice, Compression, Elevation) to limit swelling, ease pain, and protect the healing tissues; and second, knowing when those self-care measures aren’t enough and you need professional evaluation. RICE helps create the ideal environment for your body to begin repairing the damaged ligaments (Bleakley et al., 2010) [11], while “red flags” signal that a fracture or more severe ligament damage may be hiding beneath the surface. Responding quickly and appropriately during this acute window not only speeds up your return to activity but also reduces the risk of future complications (Mologne et al., 1999)[12].
RICE:
- Rest: Avoid weight‑bearing; use crutches if needed.
- Ice: 15–20 min every 2 h for the first 48 h.
- Compression: Wrap or compress the ankle – not too tight!
- Elevation: Above heart level to reduce swelling.
Red Flags – See a Professional If:
- You can’t put any weight on the foot
- There’s severe, rapid swelling
- You feel a “pop” at the time of injury and have significant bruising
Ankle rehabilitation
By now you already know that inversion, eversion and high-ankle sprains each stress different ligaments. Within each of those types, anything from a mild stretch to a complete tear demands its own precautions and pace. That’s why a good rehabilitation plan should always be tailored to the type of sprain it is, as well as its severity (van Rijn et al., 2008) [13]. Keep this in mind when reading the below presented overview of what the rehabilitation journey of an ankle sprain may look like.
| Phase | Timeline (mild → severe) | Why it varies | End goal |
| 1. Pain Control & Early Mobility | 0–3 days → 7–10 days | More swelling and tissue damage take longer to calm, so you’ll need to rest and ice until inflammation has subsided enough to move gently. | Minimal pain at rest and with light movement |
| 2. Strength & Proprioception | Days 4–10 → Weeks 3–6 | Severer fibre tears come with increased guarding and require a slower rebuild of muscle support and balance. | Pain-free resistance in all ankle directions (e.g. band work). |
| 3. Functional & Sport-Specific | Weeks 2–4 → 8–12+ weeks | The more severe the injury, the more time you need to rebuild endurance, control dynamic movements, and gradually return to your normal routine. | Full return to your regular sport or activity, pain/ swelling free and at normal intensity |
Key take aways:
- Anatomy of the ankle: Your ankle’s stability relies on lateral ligaments (ATFL, CFL, PTFL), the deltoid complex medially, and the syndesmotic ligaments between tibia and fibula.
- Know the sprain type: Inversion (foot rolls in), eversion (foot rolls out), and high-ankle sprains stress different ligaments—and each sprain can be mild, moderate, or severe.
- Watch your risk factors: Muscle imbalances, poor proprioception, past sprains, uneven surfaces, sudden spikes in activity, and unsupportive footwear all raise your odds of spraining your ankle.
- Prevention is active: Build strength and control in the ankles’ surrounding musculature in order to give your ligaments the best chance of staying safe.
- Act fast with RICE: In the first 48–72 hours, Rest, Ice, Compression, and Elevation help limit swelling and pain—while “red flags” (inability to bear weight, sudden severe swelling, a “pop” and heavy bruising) mean you need a professional check.
- Rehab is phased and personalized:
- Phase 1: Pain control & early mobility focused
- Phase 2: Strength & proprioception focused
- Phase 3: Functional & sport-specific focused
- Tailor your rehab and return to sport with a physio: Your exact timeline depends on sprain type, severity, healing speed, pain feedback, and activity goals—so partner with a professional to fine-tune each phase.
If you have suffered a recent ankle sprain or struggle with ankle instability, book a consultation with a Rise Physiotherapist to start your recovery journey!